Deutsch
 English
 Italiano


About the Shoe Last Configurator

Step 1: Start
In the first step of the configurator, you initially have three selection options:
- • Start a new last project
- • Open a saved project
-
• Upload already finished 3D files
New Last Project
In the case of a new project, first make sure to name it appropriately so that you can later identify the model in your customer account.
To start sculpting, you then only need to select which foot side you want to start with. The selected foot side has no effect on the final product, as our configurator is designed to always create a complete pair of lasts.
Open a Saved Project
If you have already created shoe lasts with our configurator, they will be saved in your customer account. By clicking on "Load saved projects" you can access your "digital warehouse" and load the desired pair of lasts back into the configurator.
Already Finished 3D Files
You already have a 3D file of your lasts in STL format? Then you can of course skip our configurator and upload your file directly via the button "To *.STL upload".
 Shoe Last Configurator: Step 1
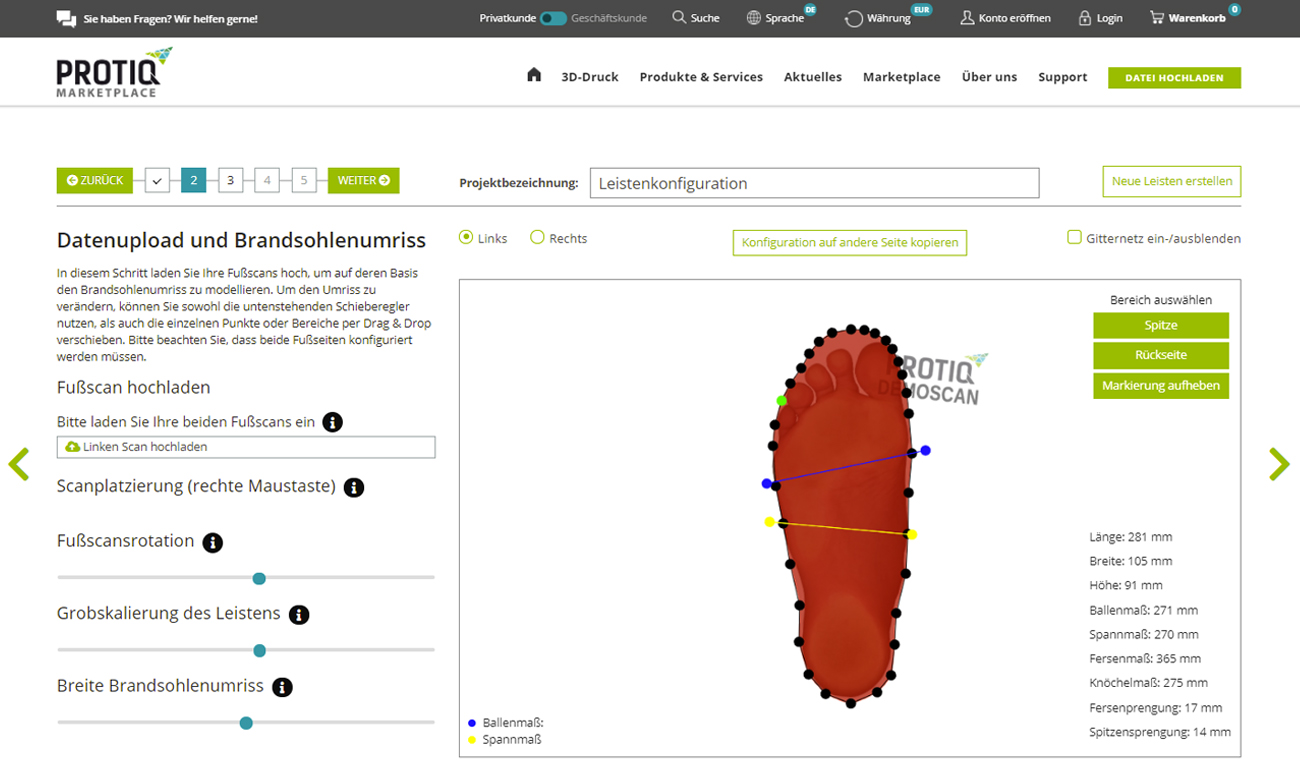
Step 2: Data Upload and Insole Outline
Upload Foot Scan
Here you first upload your foot scans. Please note that our configurator currently supports 2D scans (in jpg or png format) or 3D scans (in stl format) and that each foot must be uploaded individually.
2D scan placement
After you have uploaded your scans, you can move them by holding down the right mouse button. Please place the scans so that they are exactly under the red sole outline before proceeding with the next steps.
3D scan placement
After you have uploaded your scans, you can move them using the Gizmo. Please place the scans so that they are as centered as possible under the last model before proceeding to the next steps. If you do not see the Gizmo, you can show it below the modeling window.
Foot scan rotation
Here you can change the orientation of the 2D scans. Please rotate the scans so that they point upwards as vertically as possible. This step is not necessary for the 3D scan because you can rotate using the Gizmo.
Scaling the last
In this step, you can scale the insole outline to fit your scan. When resizing, please pay attention to the last dimensions, which update automatically in the bottom right corner. Bale and instep dimensions are measured at the points indicated by the yellow and blue lines.
Width insole outline
Use the slider to change the width of the insole outline to fit your scans exactly. If there are still discrepancies after this step, you can fine-tune it by moving the black dots.
 Shoe Last Configurator: Step 2
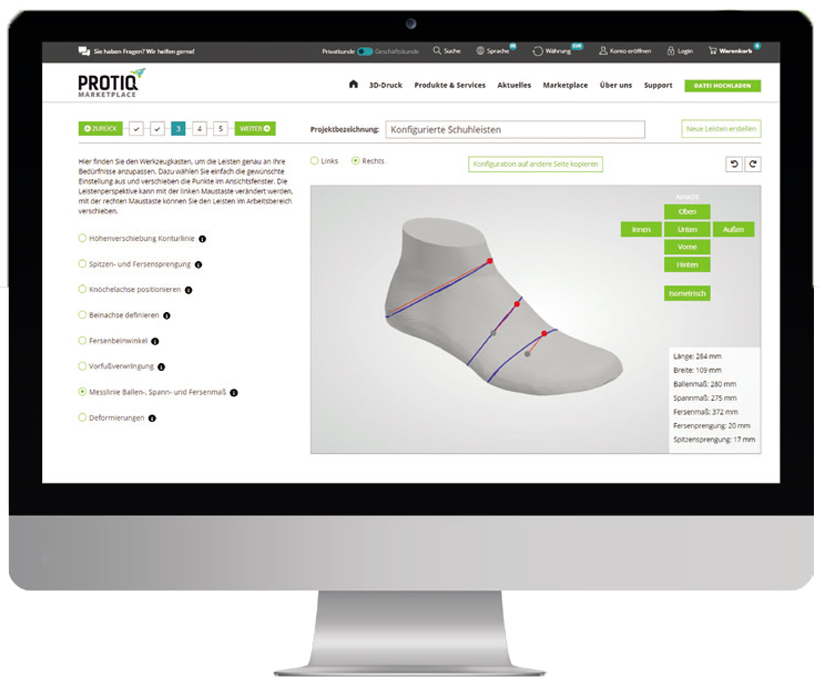
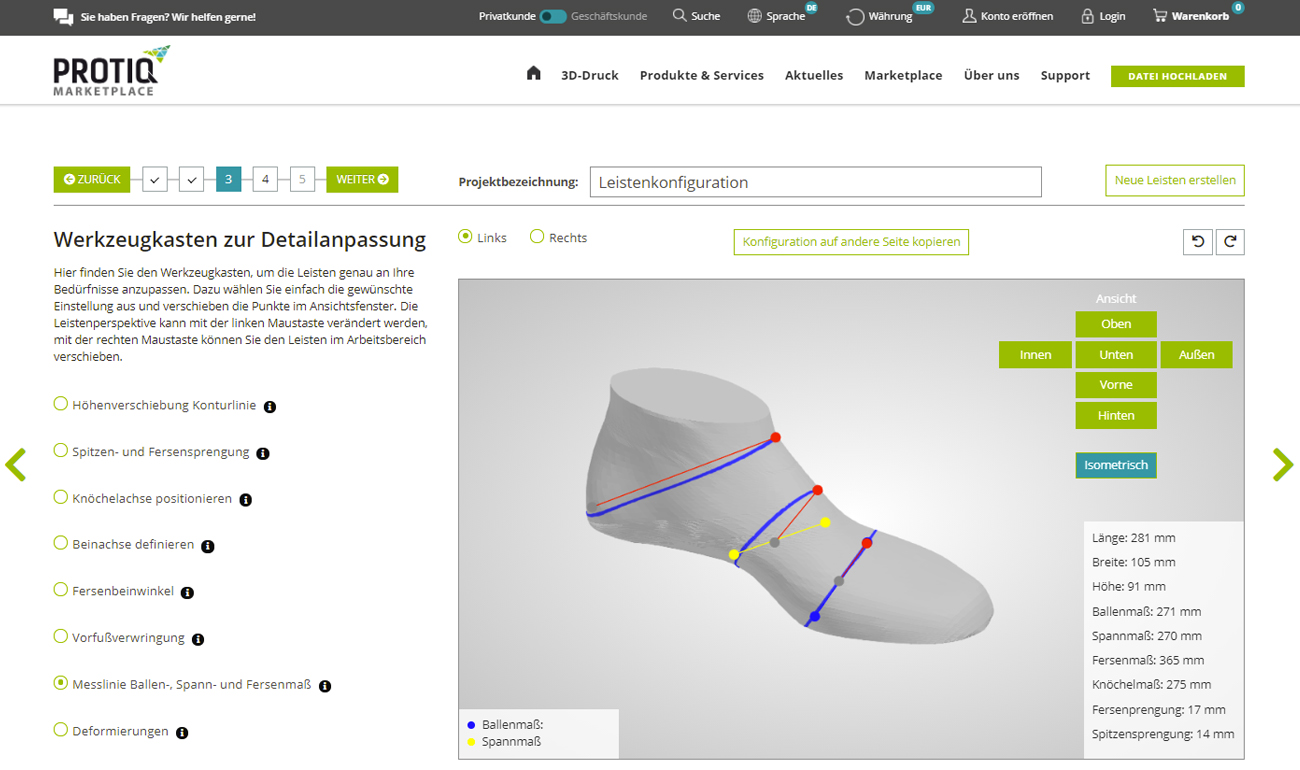
Step 3: Detail Customization Toolbox
In the toolbox, you have options to customize the last pair to meet your customers' needs. On the right, you will find various view buttons that allow you to examine your model from different perspectives. Please note: The pre-selected view of each step is always the one that is best suited for the particular operation.
Height Shift Contour Line
Here you can influence the height of the contour by moving the black points.
Toe and Heel Split
By dragging the red dots, you set the tip or heel splits. To check whether the splits meet your requirements, please look at the dimensions at the bottom right, which update automatically with each operation.
Position Ankle Axis
Move the two points to adjust the ankle axis.
Define Leg Axis
Move your mouse over the green circle. As soon as the line is bold, you can rotate the circle to define the leg axis. If you add a leg extension later, you can also readjust the leg axis there.
Calcaneal Angle
By moving the lower blue point, you can adjust the heel bone angle.
Forefoot Twisting
The blue dots are used to set a forefoot twist. When adjusting, please pay attention to the dimensions of the last, which are constantly updated at the bottom right.
Measuring Line Ball, Instep and Heel Measurement
In this step, you do not change anything in the shape of the last, but can set the measurement lines so that they correspond to the real measurement points on the foot. The ball and instep measurements are in the same place as in the previous step.
Deformations
By moving the nine points, you have the option of adding individual deformations to the last. You can also use this operation to adjust the instep and pad dimensions to your requirements.
 Shoe Last Configurator: Step 3
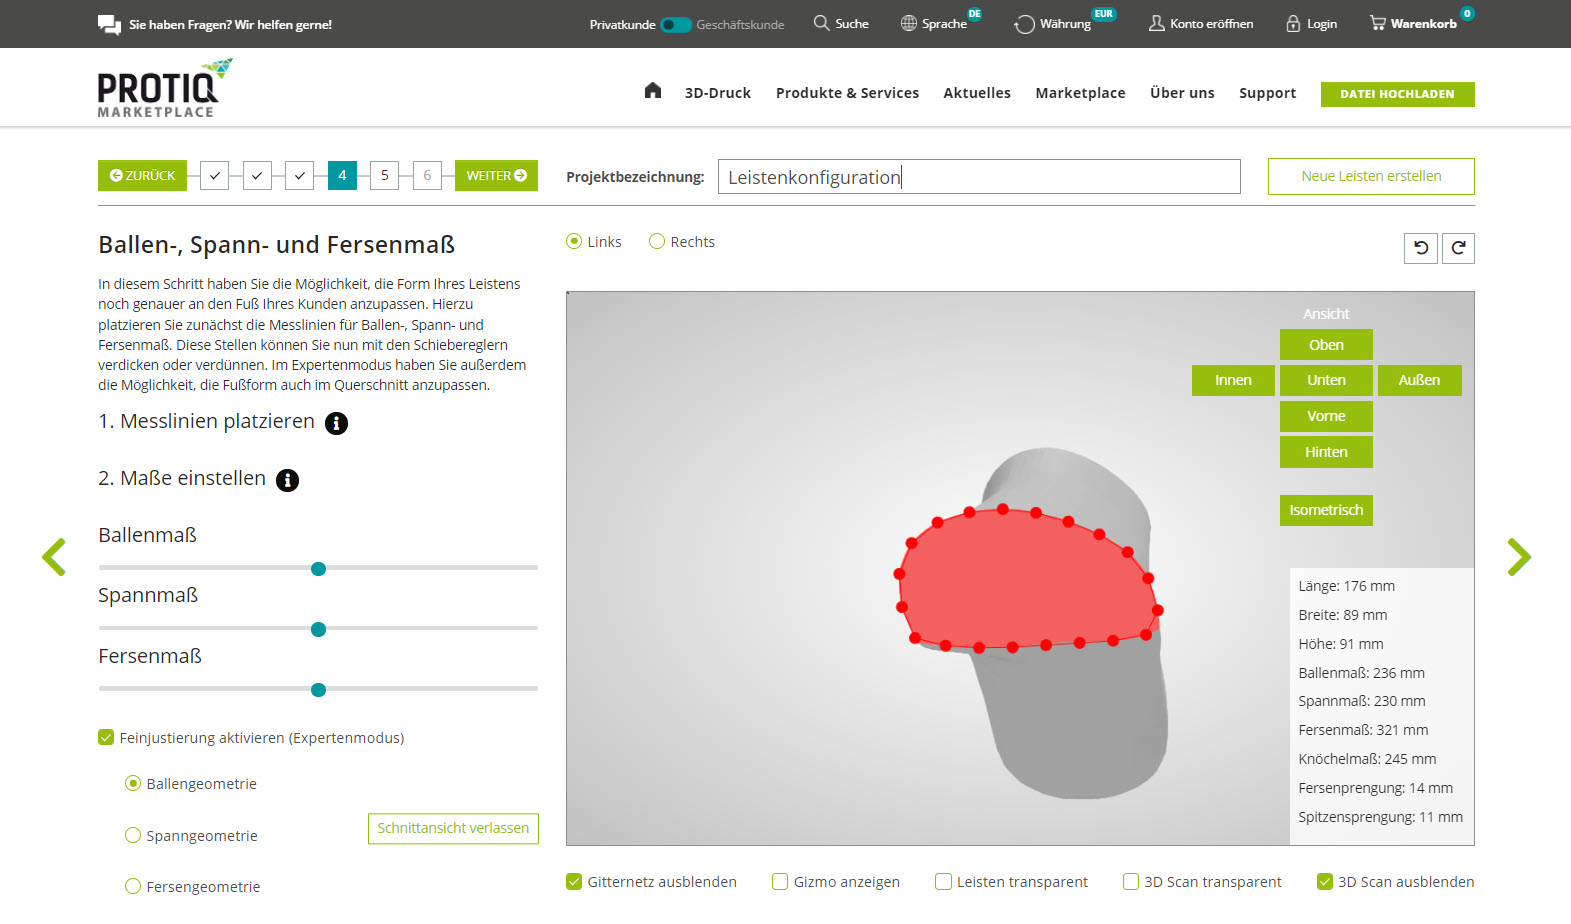
Step 4: Ball, instep and heel measurement
In this step, you have the option of adapting the shape of your last even more precisely to your customer's foot. To do this, first place the measurement lines for the ball, instep and heel measurements. You can now thicken or thin these points using the sliders. In expert mode, you also have the option of adjusting the foot shape in cross section.
Place measurement lines
Place the measurement lines where you have measured the ball, instep and heel measurements on the customer. You can then thicken, thin or specifically deform these areas.
Setting measurements
Move the sliders to thicken or thin the last at the measurement lines.
Activate fine adjustment
If you activate fine adjustment, you can perform more detailed deformations on the measurement lines in expert mode. For this purpose, the last is shown in a cross-sectional view in which the black fine adjustment points can be moved as desired. When you have finished changing the shape at a measuring line, first exit the section view to continue at another measuring line.
Smoothing
Here you can use the slider to set how smooth the transition between the measuring lines should be.
 Shoe Last Configurator: Step 4
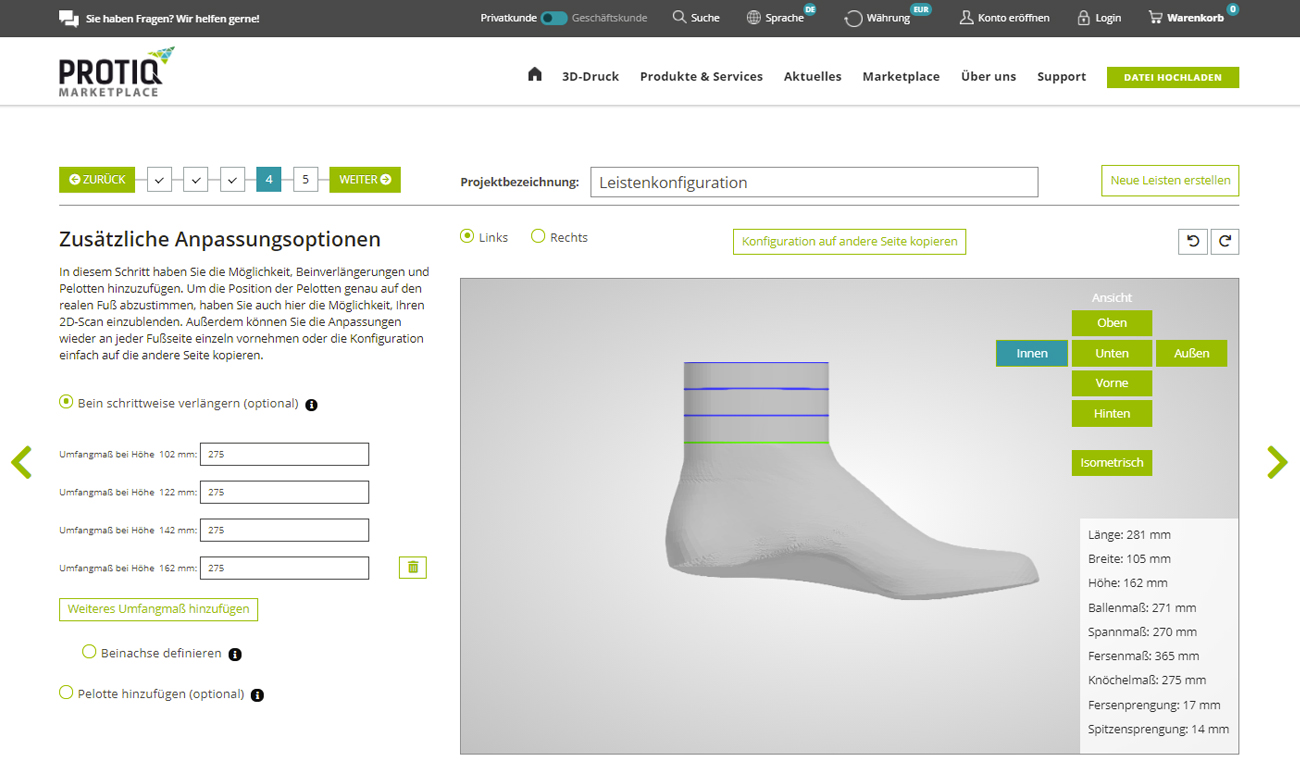
Step 5: Additional Customization Options
Here you have the option to add leg extensions and pads - both are optional.
Leg Extensions
You can add the extensions to the leg in 20 mm steps. Each extension can be individually adjusted in diameter to replicate the customer's leg as accurately as possible. You have two options for changing the diameter: either you enter the diameter value in the corresponding field or you use the arrows to add or subtract single mm.
You can add a total of six leg extensions and then also adjust the leg axis again.
Pads
Two types of pads can be added via the drop-down menu. Once you have decided on a pad shape, you can also show your scan again to position the pad exactly where you want it. Once you've scaled the pad to fit and placed it where you want it, click "Apply Pad" to subtract it from the 3D model.
 Shoe Last Configurator: Step 5
Step 6: Finish Configuration
Last Partition
In the last step of our configurator you can choose how your lasts should be split You have to choose from: Heel cut (our recommendation), 2-part, 3-part and step cut. Lasts without division are currently not provided.
Urgency
To add your configuration to the shopping cart, all you have to do now is select how quickly you need your lasts:
- • Economy: Shipping within 7-14 days
- • Standard: Shipping within 3-7 days
-
• Express: Shipping within 1-3 days
At the end click "Add to cart" - and you' re done!
(Our insider tip: You only need one of the two lasts? Then simply delete the last you don't need from the shopping cart).
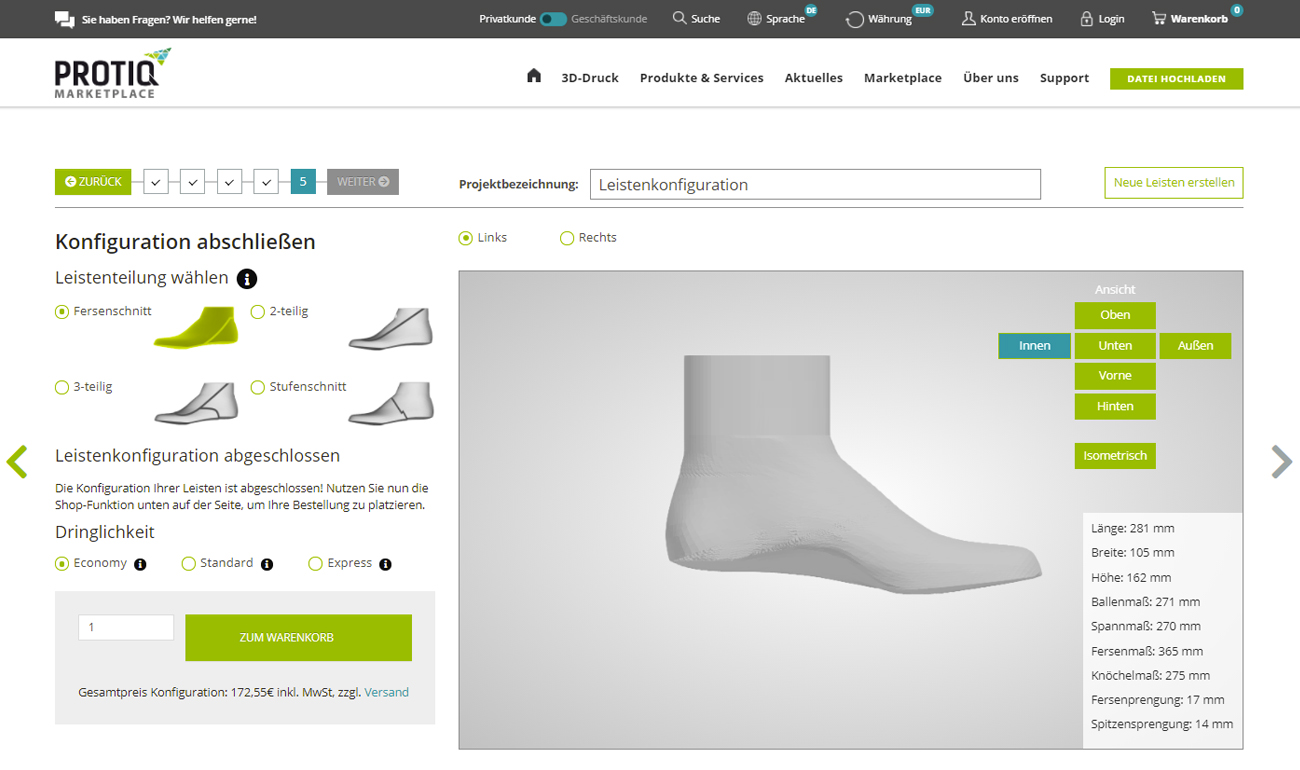 Shoe Last Configurator: Step 6
Frequently Asked Questions
-
What is the cost of a last?
The price of the last is currently entirely based on the urgency:
Economy (shipping in 7-14 days): 145€ plus VAT.
Standard (shipping in 3-7 days): 170€ plus VAT.
Express (shipping in 1-3 days): 195€ plus VAT.
The price for a pair of lasts is therefore twice as much.
-
Can I also use a 3D foot scan?
In the current version of the shoe last configurator, you can only upload 2D foot scans.
-
How can I influence the ball and instep dimensions?
On the one hand, the ball and instep dimensions depend on the scaling and width of the last (step 2), on the other hand, you can use the deformations (step 3) to change the two dimensions.
-
Why did I create a "flat foot"?
If your modeled last appears distorted and the leg does not appear to be centered over the foot, the error is probably in step 2. Please make sure that you align your foot scan with the red marked insole outline and drag the scan as centered as possible under the footprint - not the other way around!